.png)
To perform the update to PortalTalk V2, the following administrative roles are required:
-
PortalTalk Admin in PortalTalk
-
Global Admin in Microsoft 365
Steps to perform:
-
Update PortalTalk’s permissions within your Microsoft 365 tenant. This is also referred to as the consent.
-
Installing and releasing the Portaltalk MS Teams V2 app
If the above actions are not performed, the PortalTalk V2 release cannot be used.
Execute the PortalTalk consent
The reason why an update of PortalTalk's consent is required, is that a new module requests the recently used sites for the current user within SharePoint. This action requires an additional Microsoft Graph API permission. The new module is located on the new PortalTalk Activity screen.
Execution
-
Make sure you're signed in to Microsoft 365 as a Global Admin
-
Navigate to the PortalTalk web UI via https://qseu01.portaltalk.com
-
At the top of the screen is a notification that the consent needs to be updated ('Because of a new software version, the consent has to be updated.')
-
Click on the settings menu at the top right of the page and select 'Consent PortalTalk'.
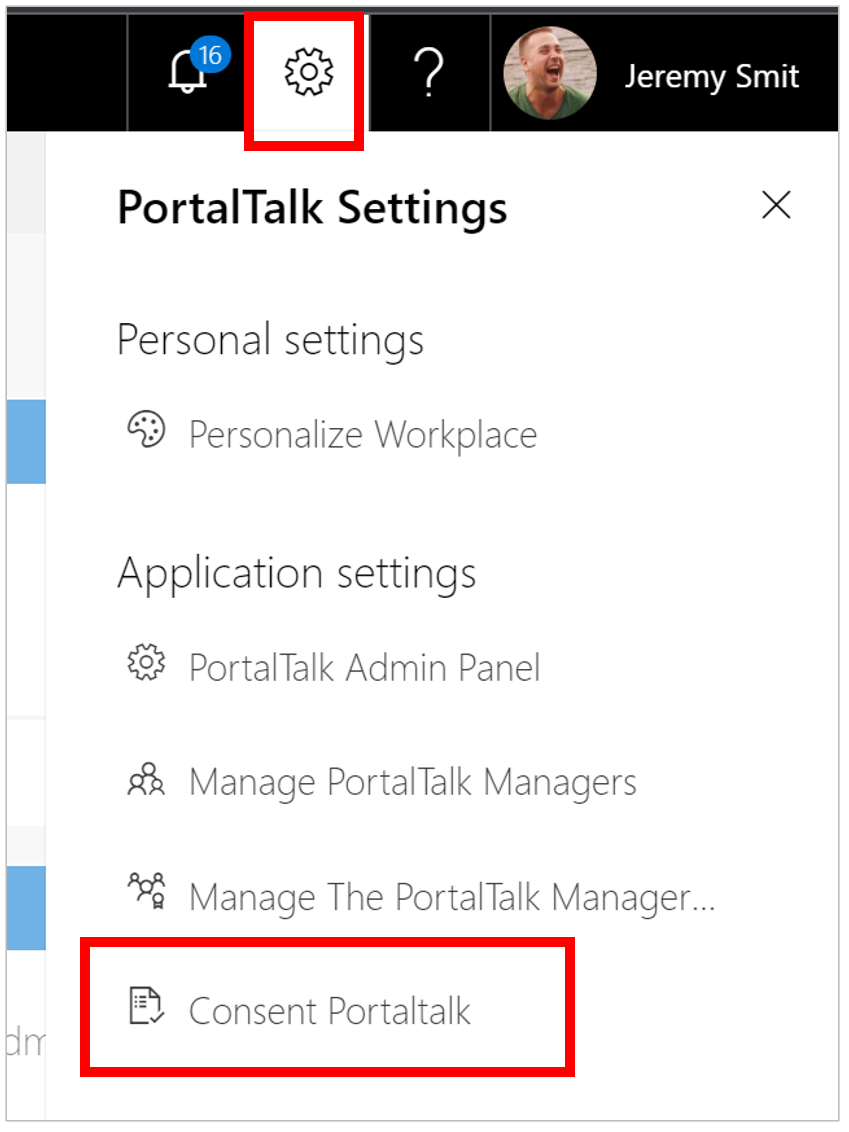
-
You will be prompted to log in again. NOTE: this must be done with the account having the Global Admin role.
-
The screen below is displayed. Click on 'Accept' and the additional consent will be added.
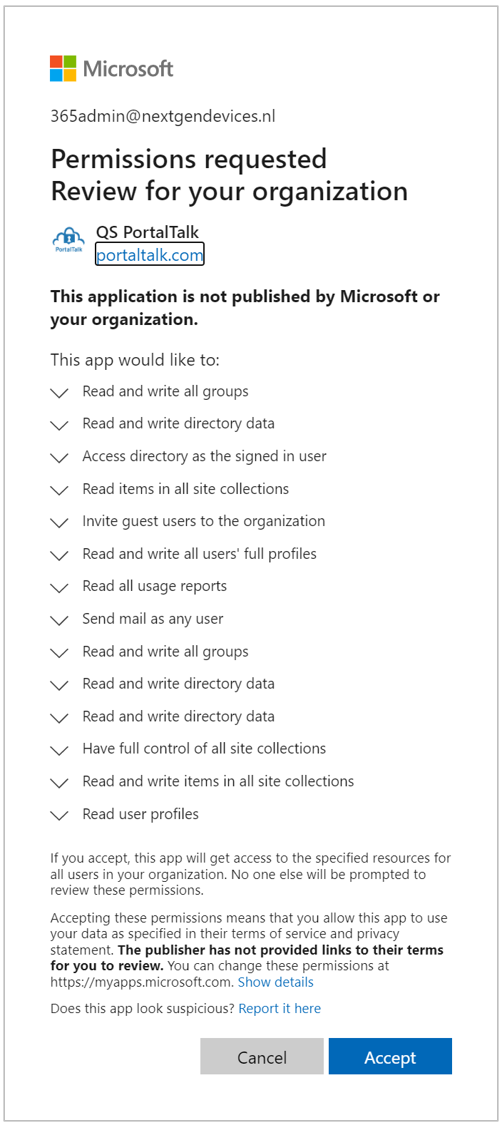
The required consent is hereby granted and ready for PortalTalk Release 2.
Installing the PortalTalk MS Teams V2 app
The new version of PortalTalk Microsoft Teams app V2 is required to use the new interface and features of the V2 version. This will replace the current V1 version.
However, this transition can be undertaken gradually. The V1 app will continue to work alongside the V2 app. At a later date, the V1 app will be disabled. This will be announced well in advance.
There are three possible scenarios for installing the new V2 app:
-
Currently, you are not using the PortalTalk MS Teams app, but the PortalTalk web UI or PortalTalk’s SharePoint integration web parts. You now want to start using the PortalTalk MS Teams V2 app.
-
You are currently using the MS Teams PortalTalk app V1 version and you want to update to the V2 app. You choose to make this transition in one go. So, after the update to V2, the V1 app is no longer available.
-
You want to use the V2 app, but the V1 app must still be operational so that you can make the transition gradually.
To perform the MS Teams app installation, the M365 MS Teams Admin role is required
Each scenario is described in detail below.
Scenario 1. New installation of the MS Teams app
-
Download the PortalTalkV2.zip file here ‘Downloads for PortalTalk’.
-
Start https://admin.teams.microsoft.com/ in the browser and login with a Teams Admin account.
-
Select Teams Apps → Manage apps. The Manage apps page provides an overview of the installed apps in your MS Teams environment.
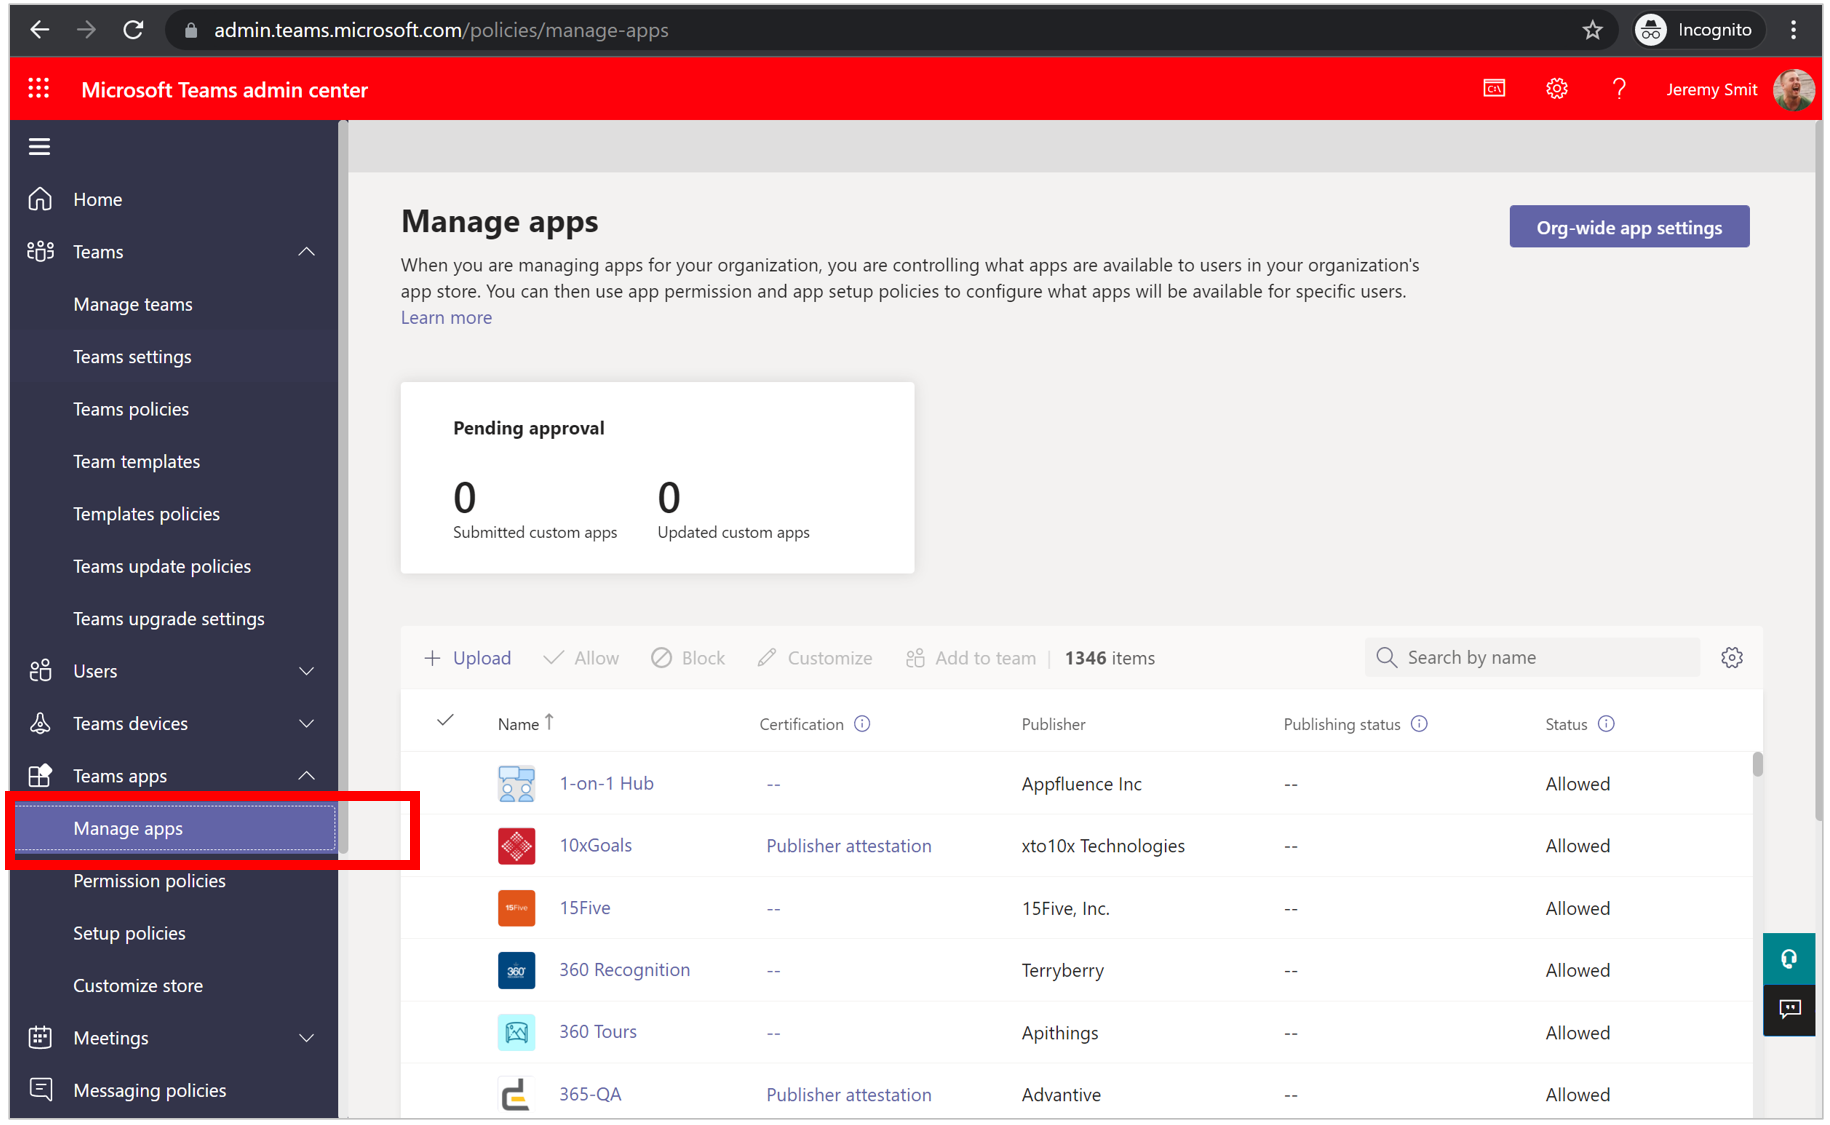
-
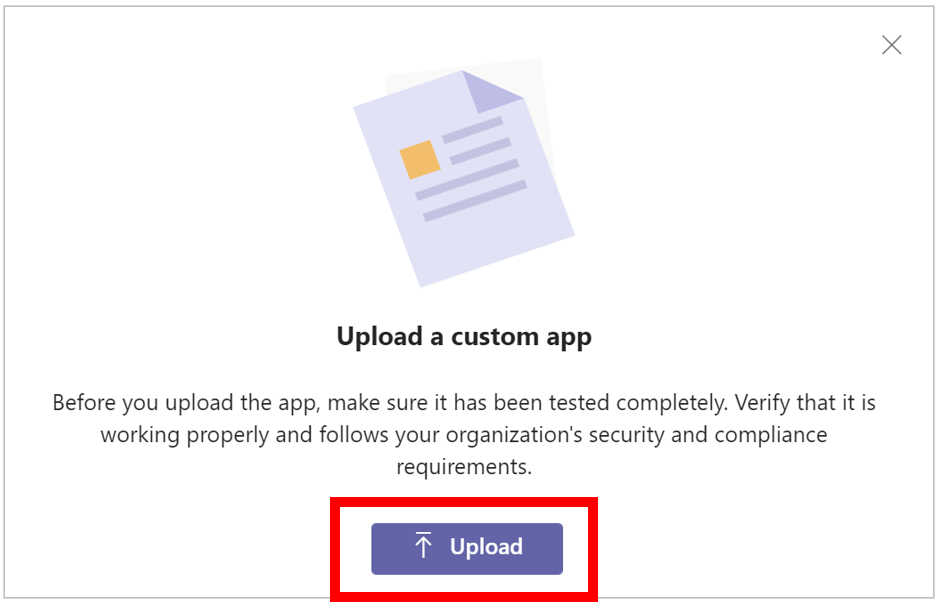
Click the option Upload.
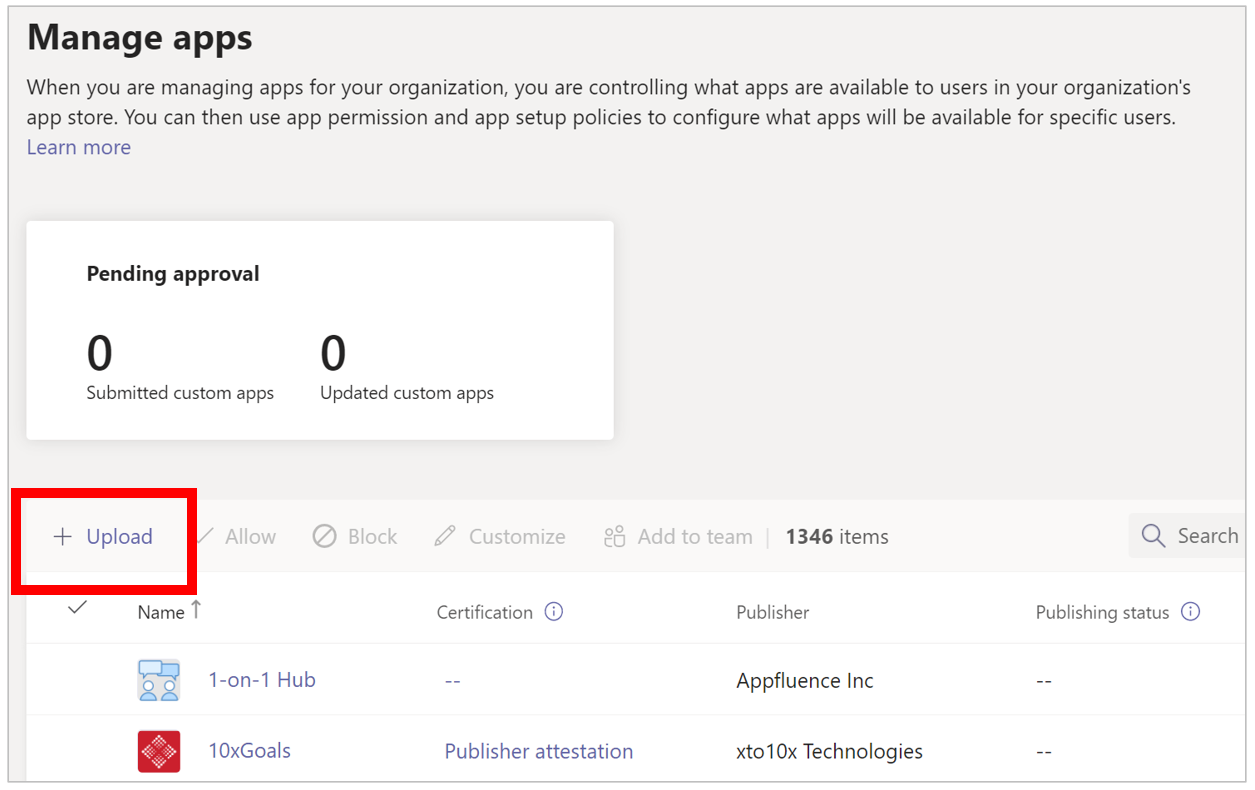
And again ‘Upload’.
-
In the then displayed Windows Explorer screen, select the PortalTalkV2.zip file and select 'Open'. The file is uploaded.
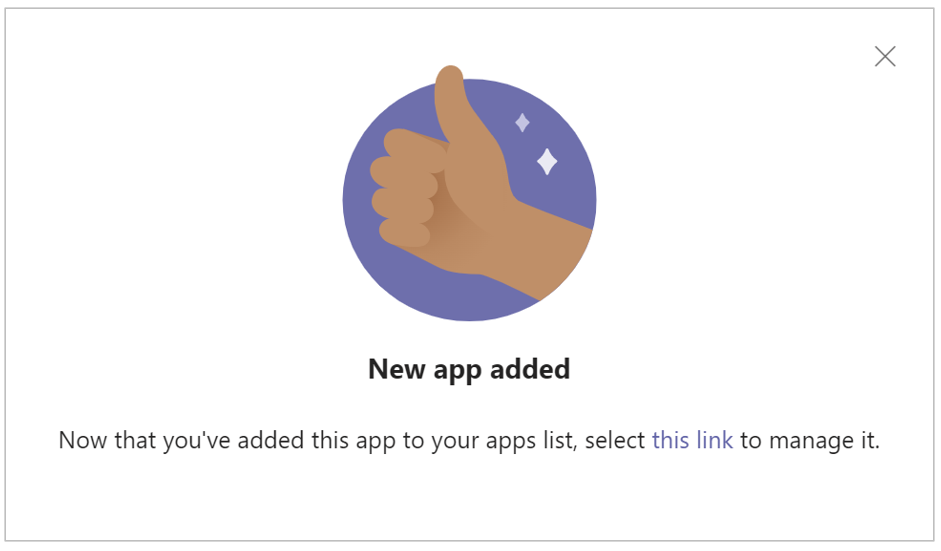
If the upload was successful, this screen will appear:
Including the PortalTalkV2 app in the Global Org-wide default app setup policy
In order to get the PortalTalkV2 app placed in the navigation panel for your organization’s MS Teams users, the app must be included in the Global (Org-wide default) app setup policy.
-
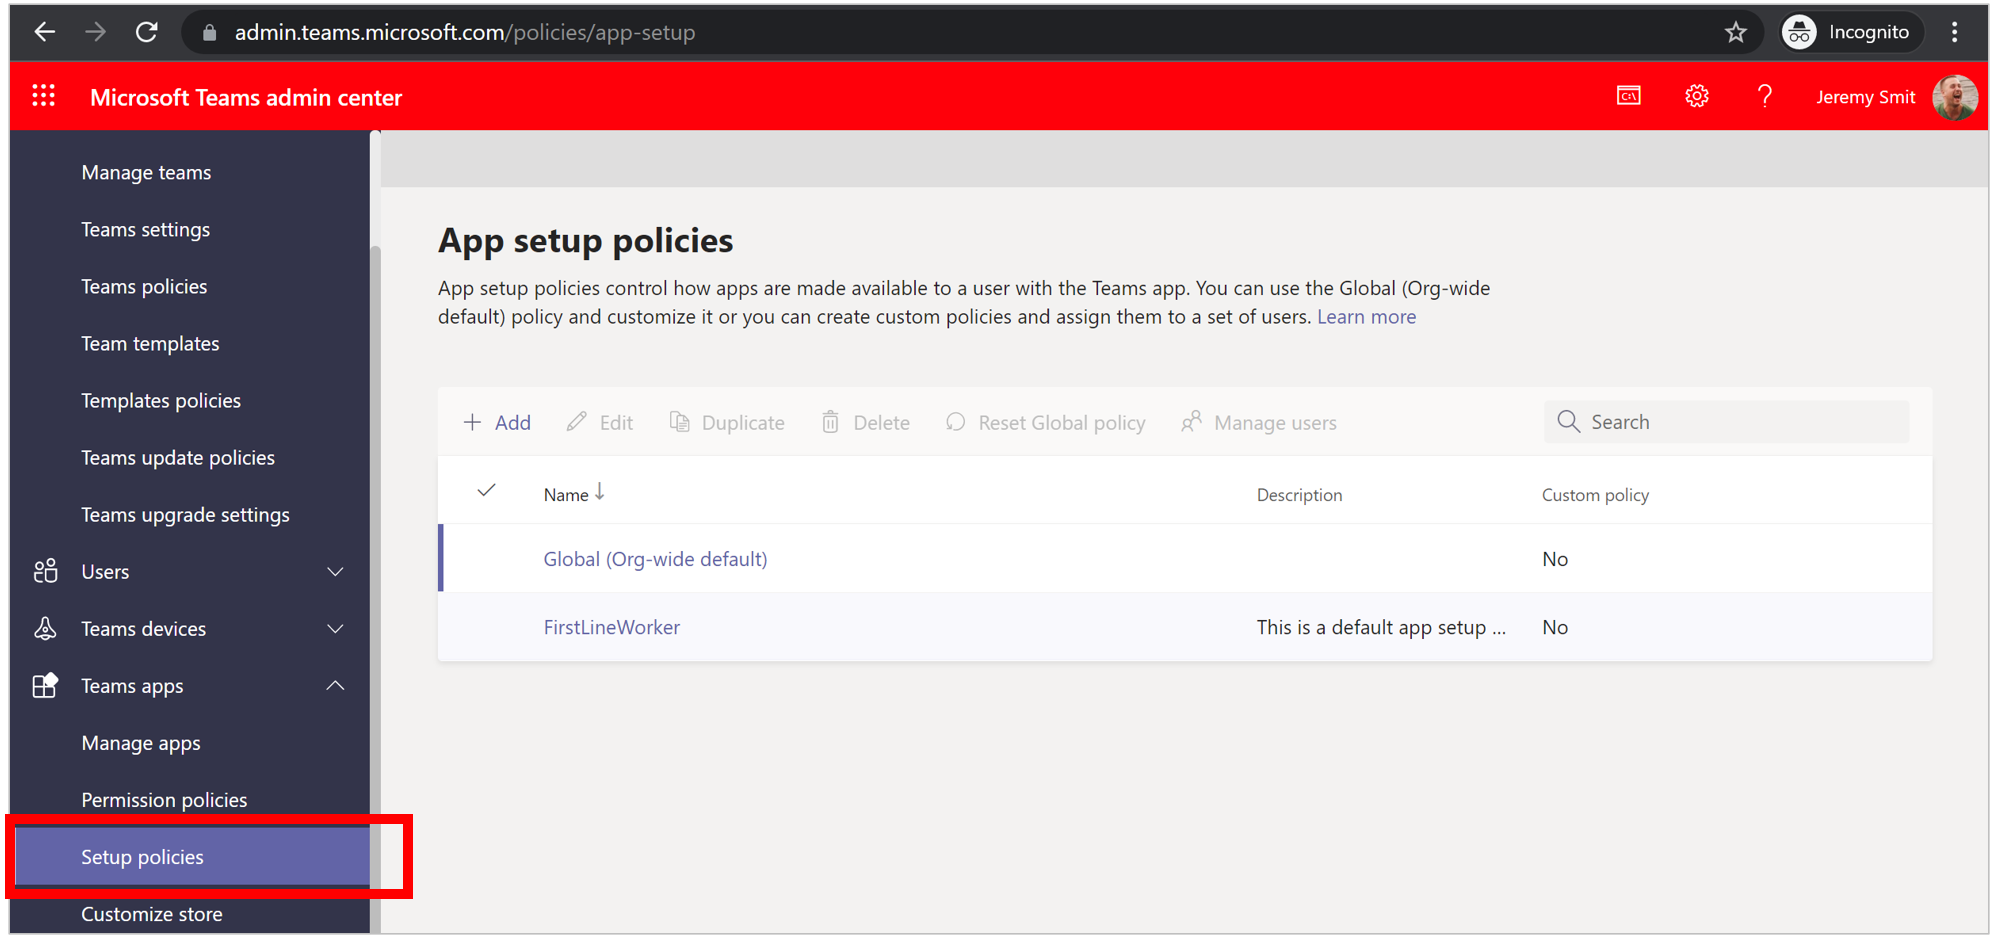
Select Teams apps → Setup policies. The App setup policies page provides an overview of the configured app setup policies in your MS Teams environment.
-
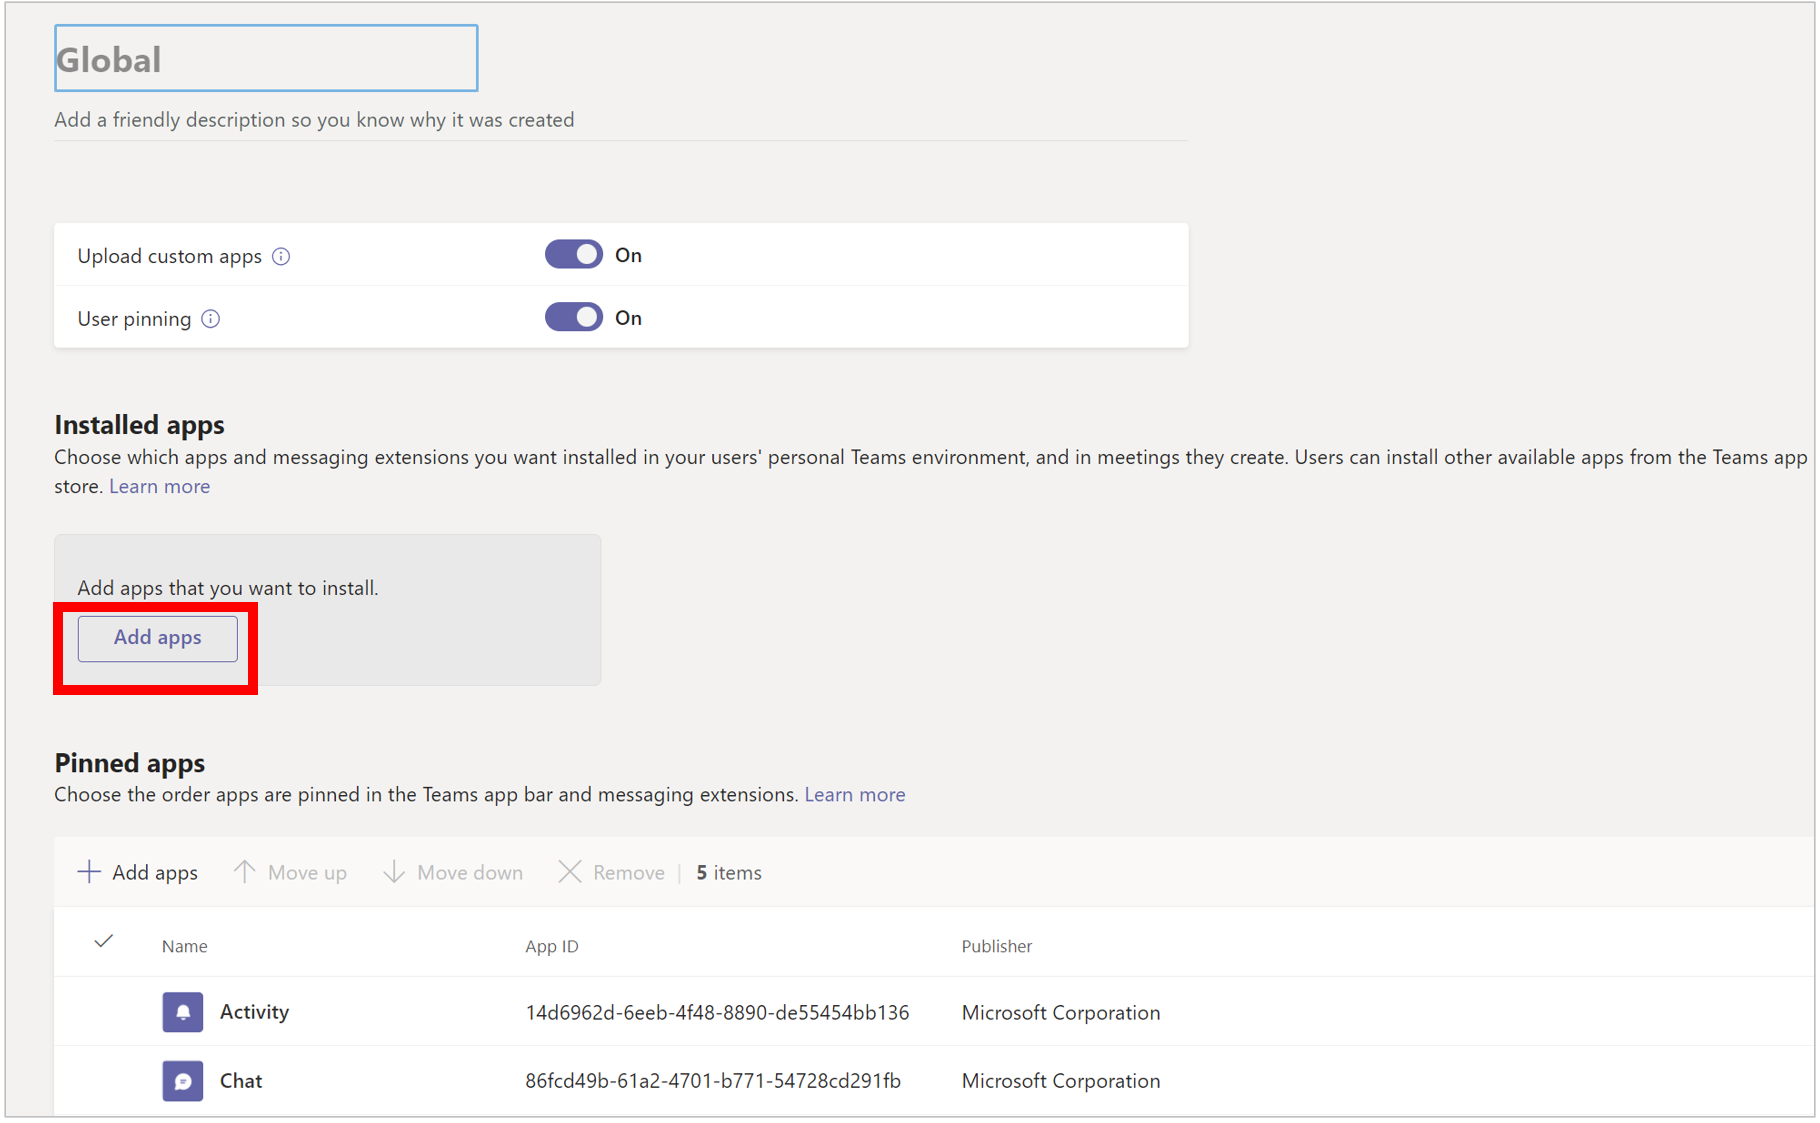
Click the Global (Org-wide default) app setup policy to open it.
-
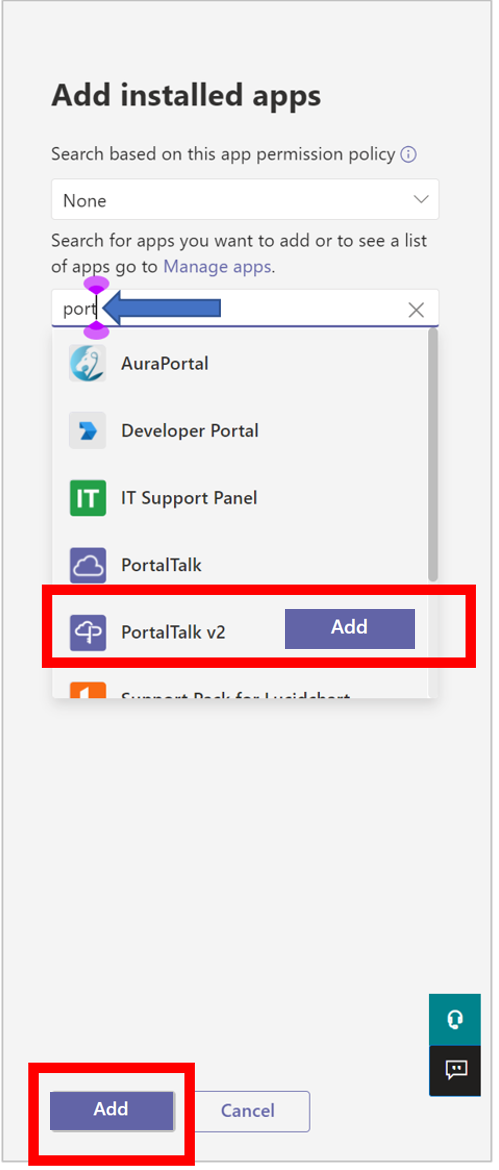
Under Installed apps, click Add apps to open the Add installed apps panel on the right hand side of the screen.
-
Search for the PortalTalkV2 app by typing its name in the search box and click its Add option when it is displayed in the search result-list. Then, click Add at the bottom of the panel.
The Add installed apps panel is closed and the PortalTalkV2 app is now listed amongst the Installed apps.
Pinning the PortalTalkV2 app within the navigation pane
-
In order to pin the PortalTalkV2 app in the app navigation pane, the app must be pinned.
-
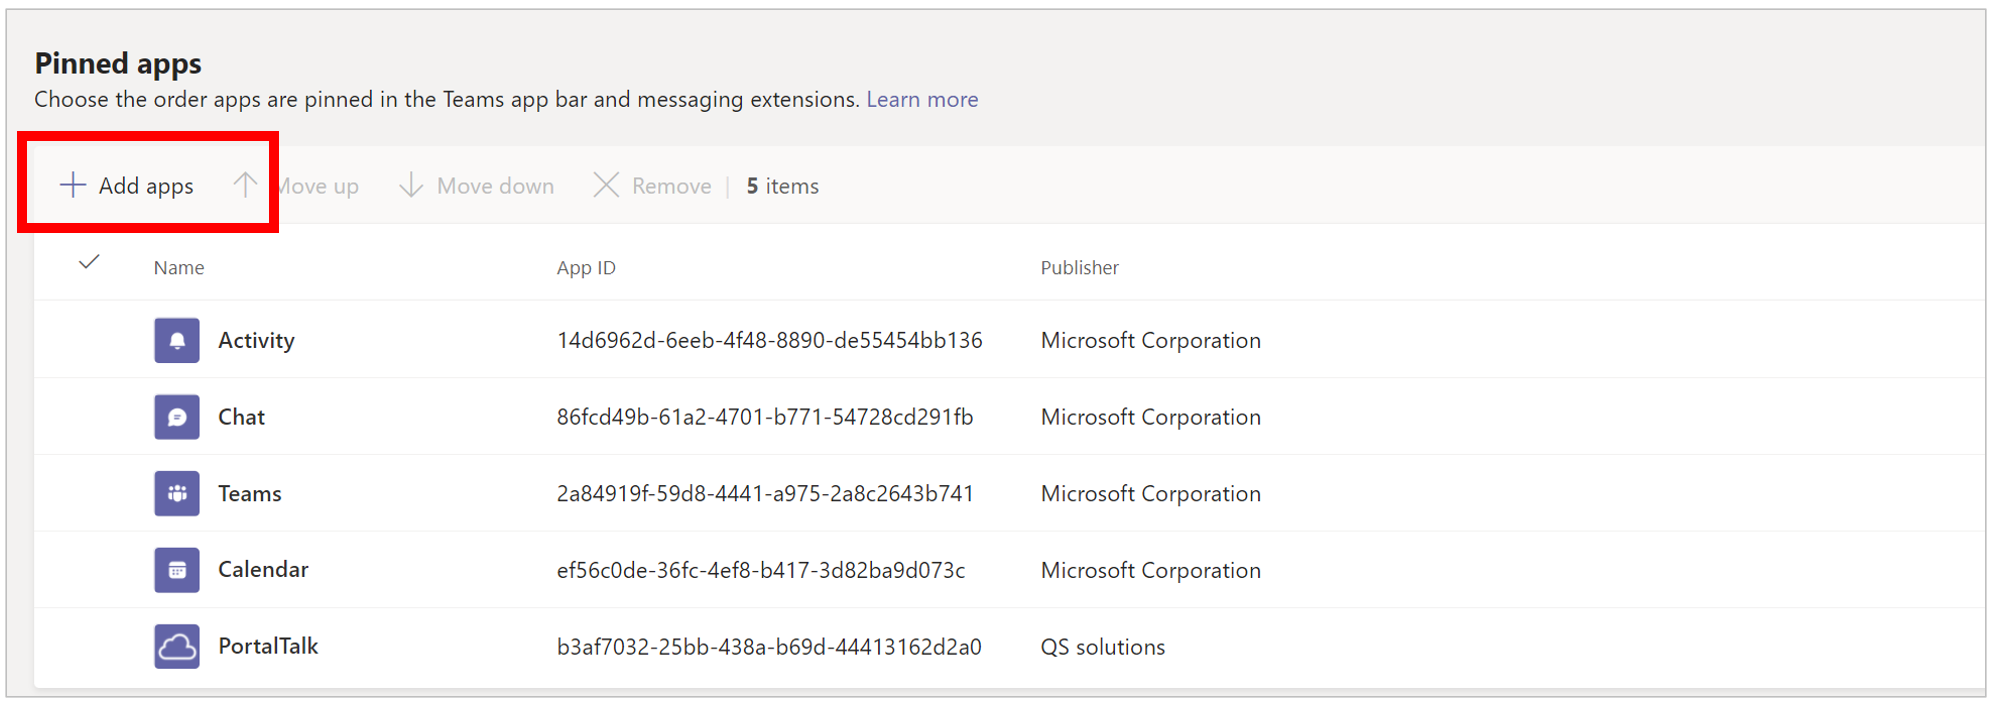
Under Pinned apps, click Add apps to open the Add pinned apps panel on the right hand side of the screen.
-
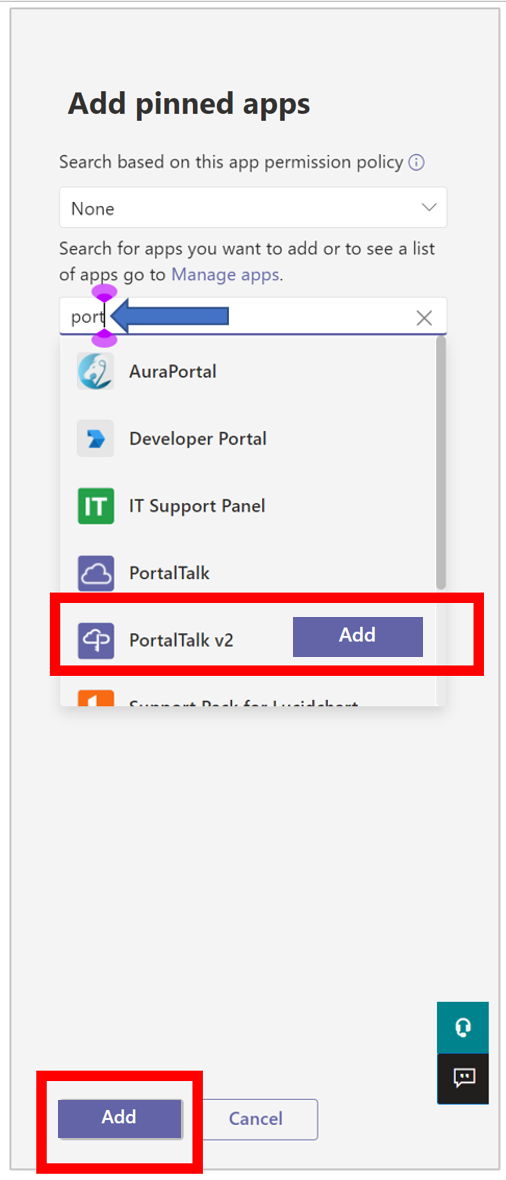
Search for the PortalTalkV2 app by typing its name in the search box and click its Add option when it is displayed in the search result-list. Then, click Add at the bottom of the panel.
The Add pinned apps panel is closed and the PortalTalkV2 app is now added to the bottom of the Pinned apps list.
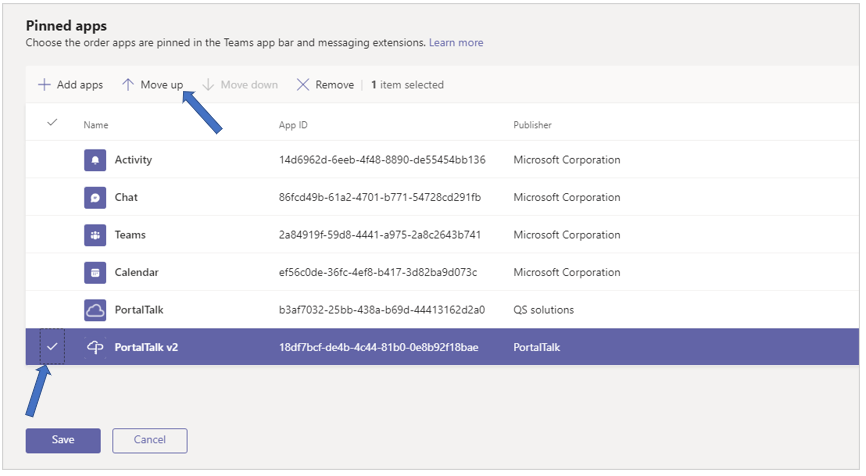
Now, you can place the PortalTalkV2 app in the desired position
-
Select the PortalTalkV2 app and use the Move up option to place the app’s navigation link at the top or any desired position of the MS Team navigation panel.
-
Click Save at the bottom of the page.
Allow the MS Teams users the use of the PortalTalkV2 app
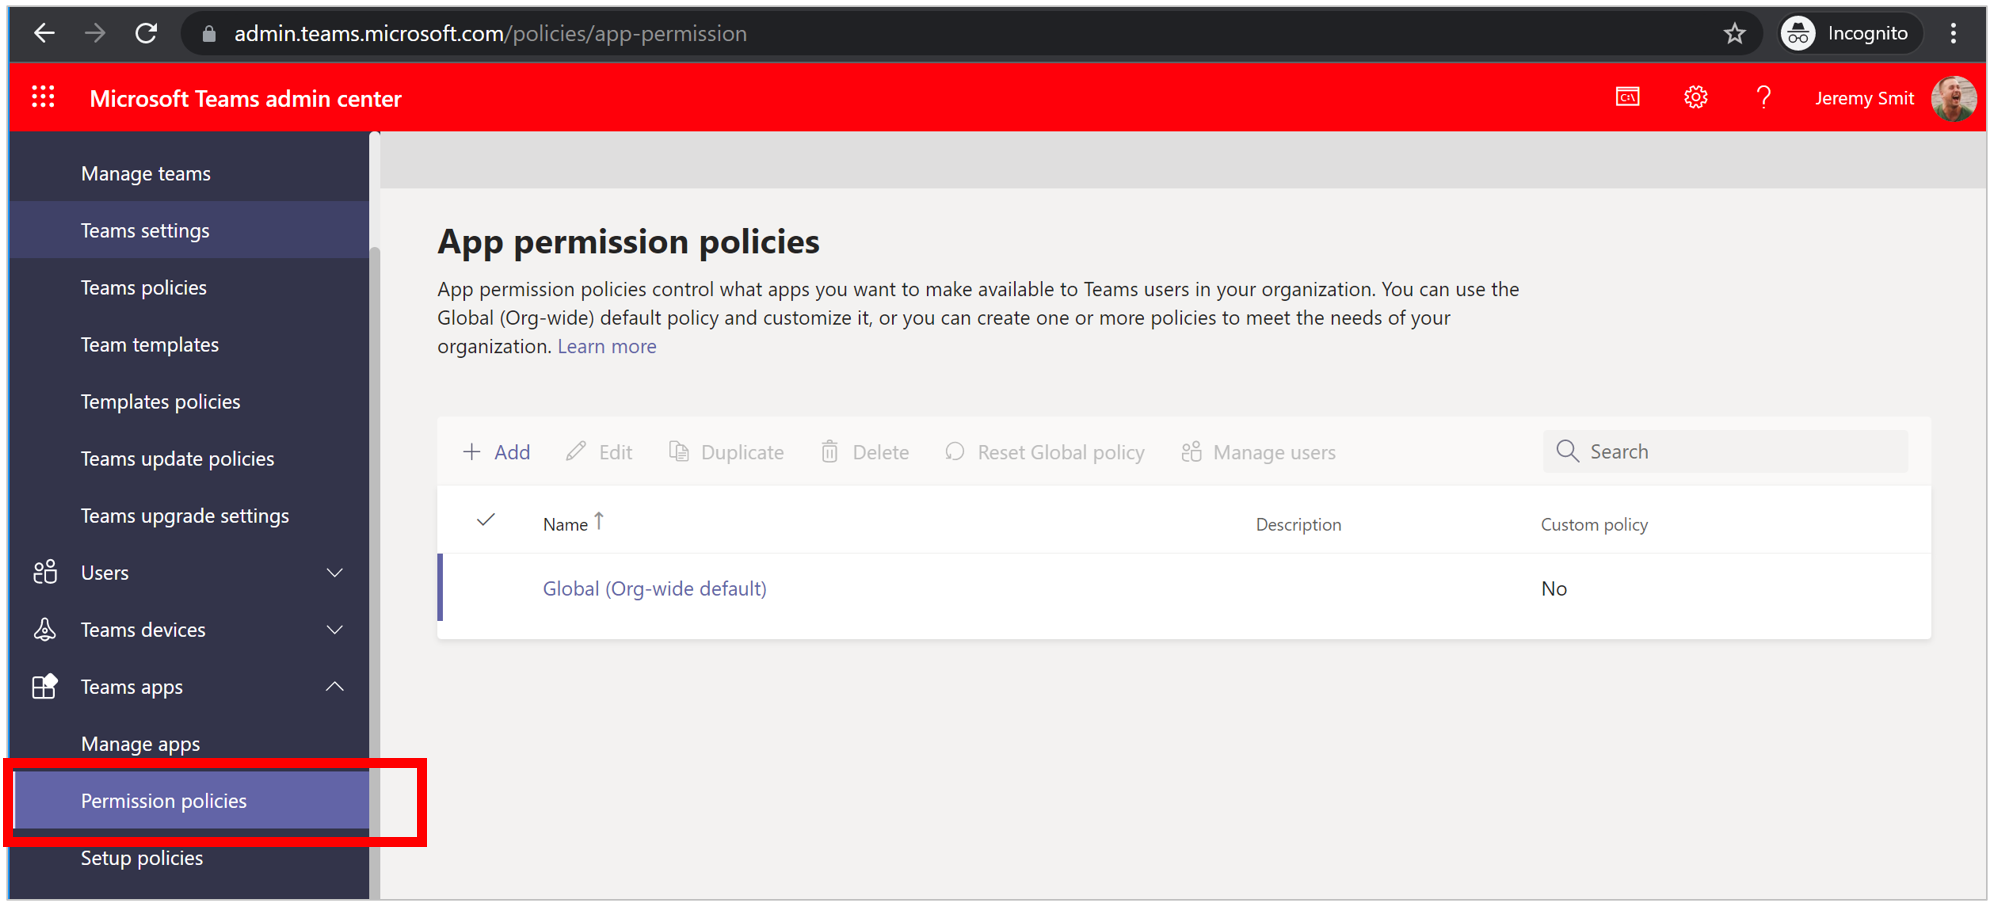
In order to allow your organization’s MS Teams users the use of the PortalTalkV2 app, the app must be included within the Global app permission policy.
-
Select Teams apps → Permission policies. The App permission policies page provides an overview of the configured app permission policies in your MS Teams environment.
-
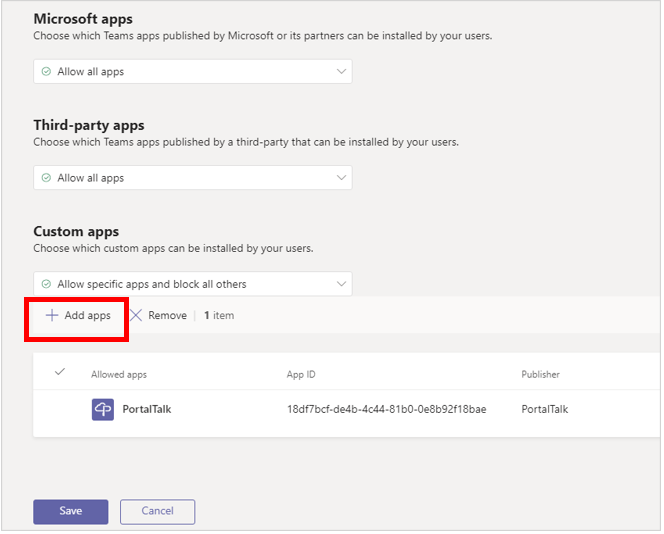
In the App permission policies page, click on the Global (org-wide default) permission to open it.
-
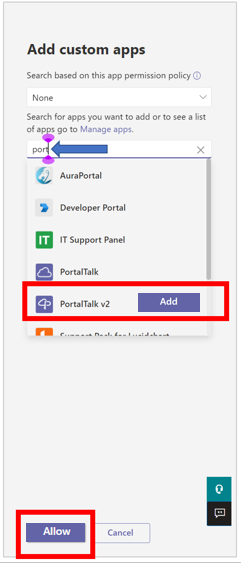
Under Custom apps, click Add apps to open the Add custom apps panel on the right hand side of the screen.
-
Search for the PortalTalkV2 app by typing its name in the search box and click its Add option when it is displayed in the search result-list. Then, click Allow at the bottom of the panel.
The Add custom apps panel is closed and the PortalTalkV2 app is now added as an allowed custom app. -
Click Save at the bottom of the page.
The scenario 1 scenario, the installation of the PortalTalk MS Teams V2 app, is now completed.
The app will not be immediately visible to the users. This can take up to 24 hours. If a user then still doesn't see the PortalTalkV2 navigation link, have them log out of the MS Teams client and log in again.
Scenario 2. Full transition from the V1 to the V2 app
This scenario requires all steps of scenario 1 to be completed, except pinning and positioning the app in the navigation panel.
Hence, the situation is that the new PortalTalk V2 app has been added and will be installed for each user. The PortalTalk V1 app is still available to your users. In the configuration of the left menu 'My Apps', we are now going to remove the V1 app and add the V2 app at the top.
To do this, perform the additional actions below.
-
Select Teams apps → Setup policies. The App setup policies page provides an overview of the configured app setup policies in your MS Teams environment.
-
Click the Global (Org-wide default) app setup policy to open it.
-
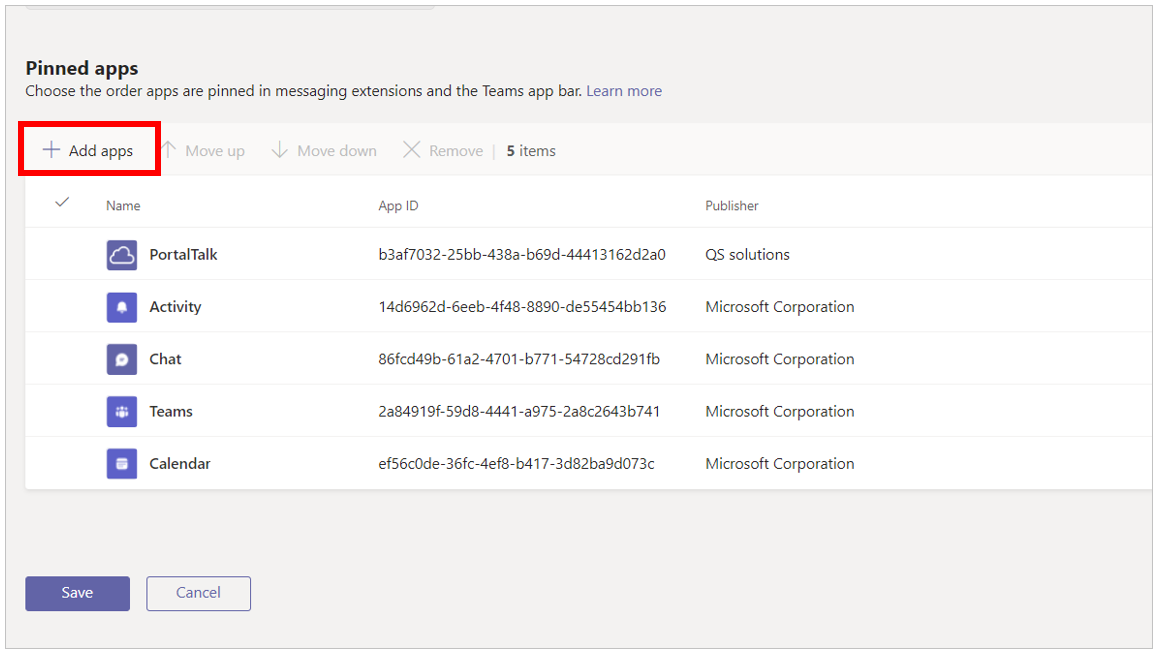
In the screen that appears, scroll down to Pinned apps
-
click Add apps to open the Add pinned apps panel on the right hand side of the screen.
-
Search for the PortalTalkV2 app by typing its name in the search box and click its Add option when it is displayed in the search result-list. Then, click Add at the bottom of the panel.
The Add pinned apps panel is closed and the PortalTalkV2 app is now added to the bottom of the Pinned apps list.
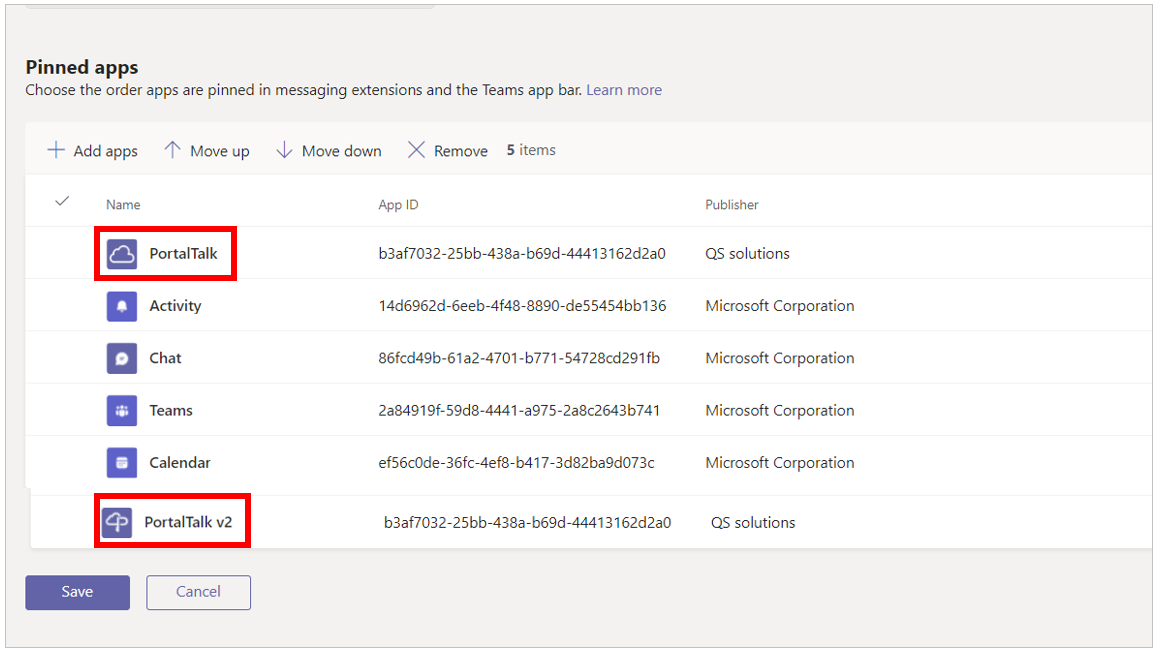
The old PortalTalkV1 app is also in this list of Pinned apps. In this situation it is possible to work with the two versions of the PortalTalk app simultaneously.
-
If you no longer wish to use the previous version PortalTalk app, select the PortalTalkV1 app and click Remove.
-
Select the PortalTalk V2 app and click Move up until the app is at the top or in any desired position.
The scenario 2 scenario is now completed.
BEWARE: The new app will not be immediately visible to the users. This can take up to 24 hours. If a user then still doesn't see the PortalTalkV2 navigation link, have them log out of the MS Teams client and log in again.
Scenario 3. Phased transition from the V1 to the V2 app
This scenario is very similar to scenario 2. In scenario 2 you can choose to have the PortalTalk V1 and V2 app active at the same time. In scenario 3 we explain how it is possible to have a limited group of users test the V2 app, while the other users are still using the V1 app.
For Scenario 3, start running Scenario 2 up to the stage where both versions of the app are part of the Pinned apps list. In this situation, both version 1 and 2 of the PortalTalk app can be used simultaneously by the users.
In order to get the PortalTalkV2 app placed in the navigation panel for a limited group of MS Teams users, the app must be included in the related app setup policy.
Start by removing the PortalTalk V2 app from the pinned apps.
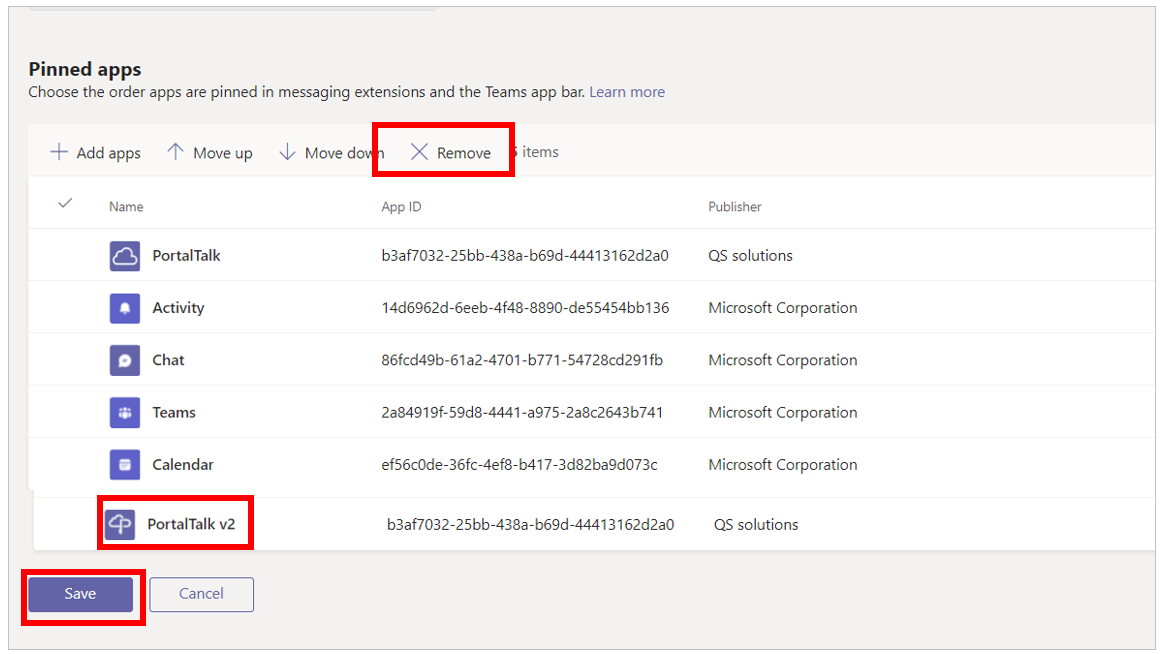
-
Select the PortalTalkV2 app and click on Remove.
-
Click on Save at the bottom of the page.
-
Select Teams apps → Setup policies.
The App setup policies page provides an overview of the configured app setup policies in your MS Teams environment.
You will now create a new configuration policy, which will include the users who will try out the new PortalTalk V2.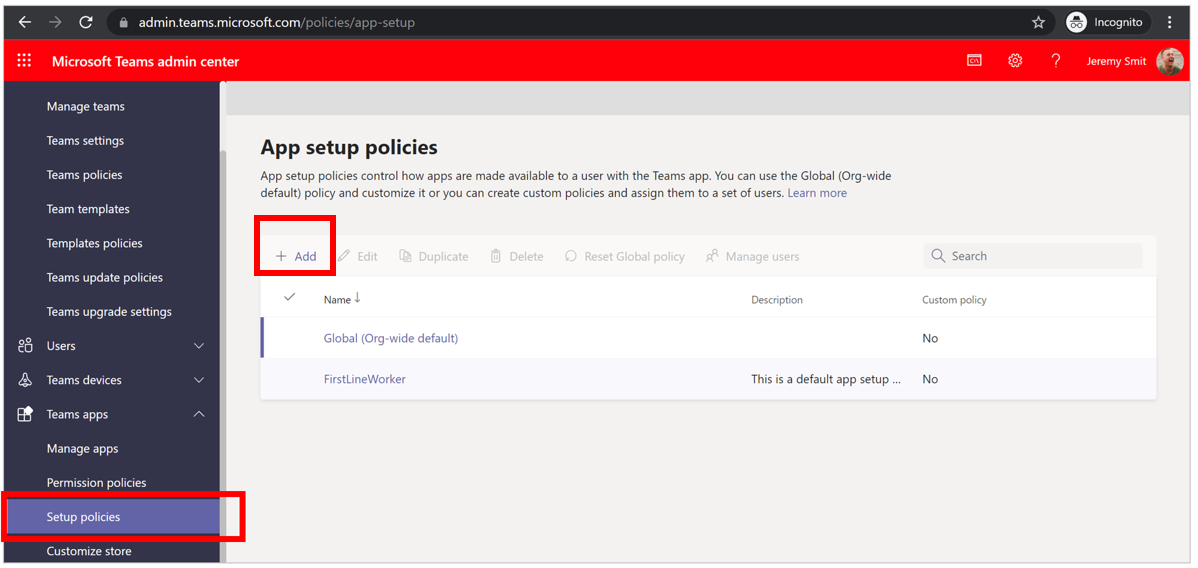
-
Select the option + Add.
-
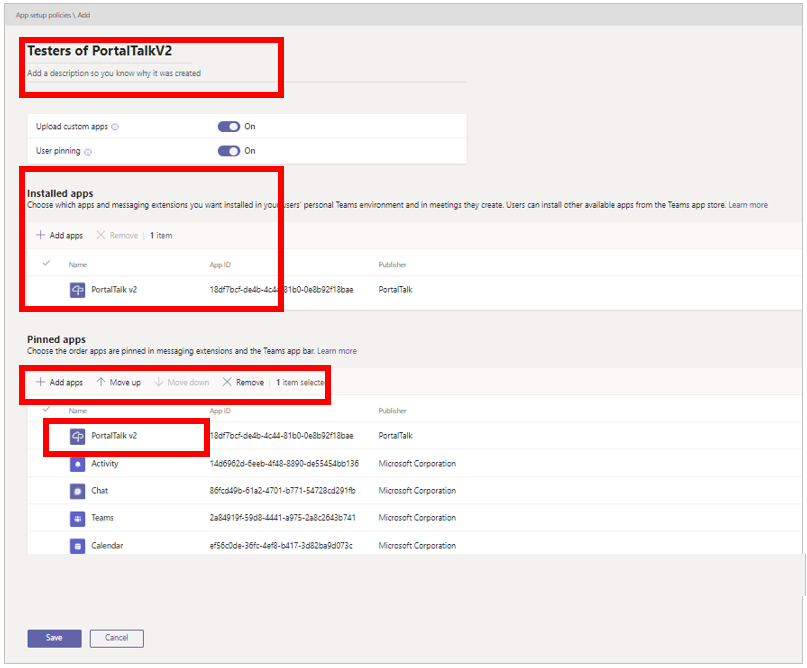
Enter a name and a description for your test group setup policy.
-
Add the PortalTalkV2 app to the Installed apps list.
-
Customize the Pinned Apps menu. This is done by leaving the apps that should stay, removing the apps that need to go and moving the PortalTalk V2 app at the top or any desired position.
-
Click Save to save the newly created setup policy for the limited group of users who are going to try out the new PortalTalkV2 app.
Now the set up policy is in place, the users concerned have to be added. -
Select Teams apps → Setup policies.
The App setup policies page displays the newly created set up policy.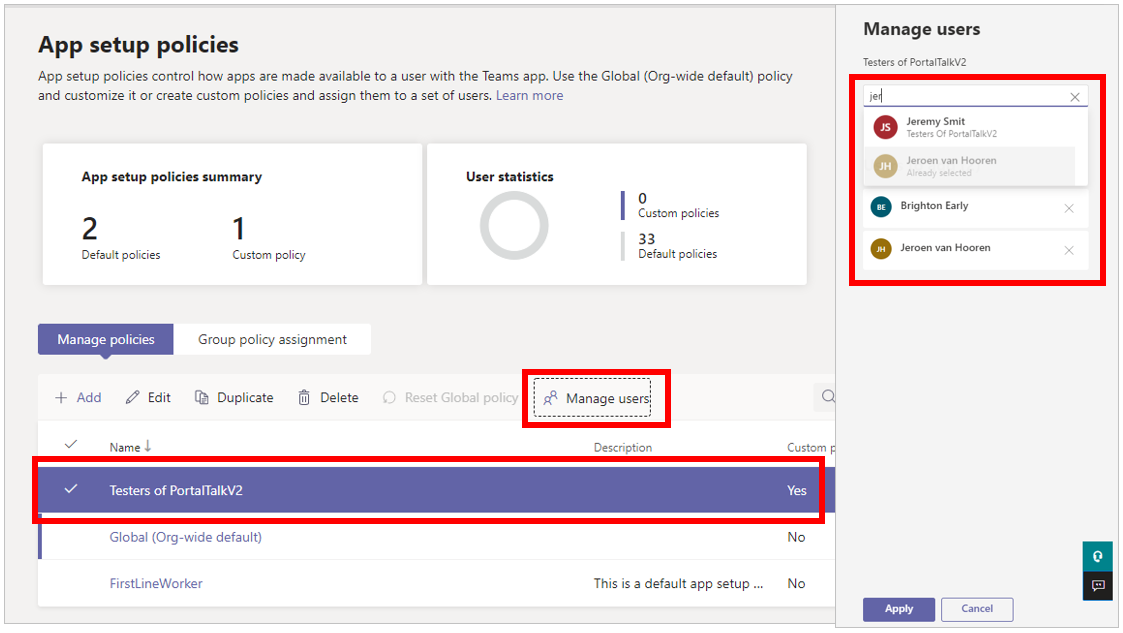
-
Select the newly created setup policy and click the option Manage users to have the related panel displayed on the right side of the screen.
-
In the Manage users panel, search for and add the users that are to try out the PortalTalkV2 app.
-
Click on Apply at the bottom of the Manage users panel to confirm.
The scenario 3 scenario is now completed.
-
If a user is assigned to a custom set up policy, the default Global Policy will no longer apply for this user. So make sure that all apps that can be assigned to this user are assigned in this custom set up policy.
-
It is currently not possible to add an (A)AD group to the set up policy. This can only be individual users. Microsoft will release an update for this in due course.
-
After adding the users, it takes a maximum of 24 hours before this set up policy is active for them.